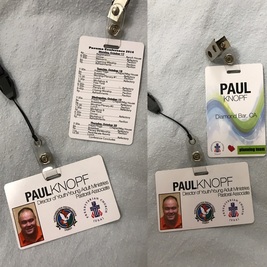
Want professional looking PVC nametags but don't have the budget to get the expensive system? I have a potential option for you. I have created professional looking PVC nametags for only a fraction of the cost that big companies use to make them. Here's my setup..
What I used:
Startup cost (printer, tray, and punch): ~$111
Cost per nametag after that: $0.18 (pvc card) + $0.10 (badge clip) + $0.05 (ink cost approximate) = $0.33 per nametag
or if you use a lanyard: $0.53 per nametag
What I used:
- Printer: Canon IP7200 picture printer; $75 on Amazon (click here to see amazon page)
- Blank PVC cards from Brainstorm ID; $18 for 100 cards on Amazon (click here to see amazon page); note: if you order from Amazon, make sure the vendor is Brainstorm ID. I have ordered from a cheaper distributor, but those cards did not work. You can also purchase it direct from Brainstorm ID (click here to see their webpage)
- PVC card printer tray (J tray): $20 on Amazon (click here to see amazon page; also available from Brainstorm ID website, click here)
- Slot Punch by TruLam: $16 on Amazon (click here to see Amazon page)
- Badge Clips: $10 for 100 on Amazon (click here to see Amazon page)
- Lanyards: $30 for 100 on Amazon (click here to see Amazon page); note: I was particular about this one because of the wide clip; there are cheaper and different options available
Startup cost (printer, tray, and punch): ~$111
Cost per nametag after that: $0.18 (pvc card) + $0.10 (badge clip) + $0.05 (ink cost approximate) = $0.33 per nametag
or if you use a lanyard: $0.53 per nametag
| Step by step guide:
| Here is a video to help see the step by step process. I was in the process of making our family's Christmas ornaments that we will be sending to family and friends. Same process, just a different design. |
It will take a little practice to get the final product you want, so be sure to order extra cards and know that you will have to toss a few while you perfect your setup. It works quite well for me and I hope you can same some money and create some excellent quality nametags in your own environment.

 RSS Feed